|
A few tasks today in between some light showers and an otherwise warm and steamy summers day. The main task was to replace a step tread that had started to rot from one end with part of the edge getting closer to breaking off if one stood on it. The tread was coach bolted from the underside so these were removed and the new step tread cut to length, edges beveled and sanded, coach screw holes drilled, then painted on the underside. While that paint was drying I did a quick job to re-string a fence mounted clothes line as the old cord had deteriorated from being in the sun for many years. Then it was back to the step tread to turn it over and screw it in place, then paint the top side. Six coach screws hold the replacement step very firmly in position from underneath with a clean and smooth finish on top. After the paint had some time to dry a second coat of paint finished the job. While the colour isn't an exact match future painting of other parts of the house will resolve that issue. 
0 Comments
When I worked for Telstra I had a few sayings that reflected my ethos for the way I worked and the pride I took in whatever task I was doing. No task was too trivial and no task was too complex - I always gave my fullest attention to detail in all things. The saying that springs to mind here is as follows: A good technician always uses the right tool. A good technician can also improvise when necessary..!! In my Telstra jobs I often came across work done by others where they had not used the right tool (we had lots of specialised tools) and in the process they had made a real mess of the job and it required further remedial attention to fix it properly as well as make it neat and tidy again. A recent task required me to transport a large 2.5m long piece of heavy hardwood to a customer. How do you do this when you own a luxury vehicle suited for domestic use? How do you do this without incurring the cost of renting a vehicle for a 30 minute drive from the timber yard to the customer? Answer = improvisation 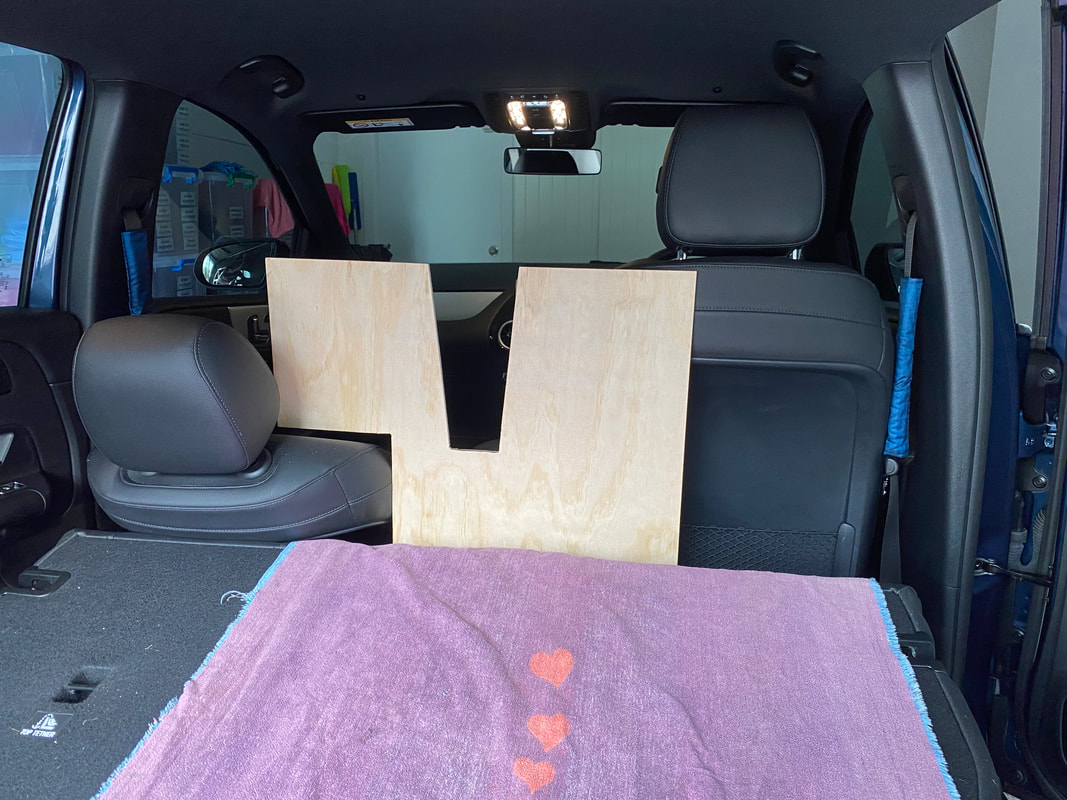 The photo shows my $20 solution to transport the piece of wood in my regular car without the heavy piece rubbing or leaning on any part of the interior. The back seats are folded down with an old towel used to protect the back of the seats.
Between the seats I custom made a sheet of 7mm plywood to fit around the seat leaning back with a "V" shape cut in the middle to support the 2.5m plank of hardwood. The bottom of the plywood rests on the floor and was very stable throughout the short journey. The 2.5m plank sat slightly diagonally from the front left of the vehicle through the supporting "V" to the back right so it was well away from me as the driver. Needless to say the idea worked perfectly and the task was completed quickly, safely and simply. Another fairly simple task recently was to assist in creating an outdoor shower space as friends expanded the functionality of their pool area. They have or will be adding a spa and infrared sauna and wanted an outdoor shower space to make the most of the generous space available. The customer purchased these timber panels from Bunnings but didn't have time to install them as they both work long hours and also have to travel at times. There were some complications as one had to be attached to an aluminium fence, and the other to part of the house. Both had to be off the ground and have fixings that would closely match the planned copper/brass shower fittings to follow. I found some bolts at Bunnings that have flat heads with hex-key heads that sit almost flush with the timber with a variety of lengths needed. A plumber has since added the shower fittings and drainage to complete their project. I wonder if I will get an invite back to "test" the new facilities..?  In 2015 I was living in an old Queenslander at Annerley which had been mostly renovated with a new built-in area underneath. The job was quite well done and this blog is no reflection on the previous owner or the contractors doing the work. On the lower level was a double garage with an internal door into the downstairs living space including a bedroom, the kitchen, dining and lounge areas. Between the garage and living space was a lockable entry door, and this door was keyed-alike with most other entry doors around the house. One day the lock broke which presented the problem to be addressed and presented a question - call a locksmith to have the lock replaced (which would likely cost a couple of hundred dollars) or remove the lock, pull it apart and see what had gone wrong? Naturally I chose the latter option first to see what was wrong....maybe I could fix it. The photo below shows the before and after of the repair job.  What had happened was the spring that pushes the lock tongue out had snapped so you could not close the door nor could you lock it. I knew finding the same shape spring would be just about impossible but on looking at the lock mechanism design I could see that a regular expansion coil spring, placed around the vertical shaft attached to the tongue, would do the same thing but in a different way. I know Bunnings is supposed to have everything, but this was too specialised so I visited a local hardware store as they often have more unusual items not available in the so-called major stores. I asked the gentleman in the shop and he pulled out a dusty box with a variety of springs in all shapes and sizes. There was not one to replace the broken one, but there was one like what I imagined would do as a replacement fitted in a different way. He didn't know how much to charge me as there were no prices marked on the box, so we agreed on $1.  I took the spring home and fitted it to the lock as shown above - it not only fitted but it worked exactly as I had imagined it would. The only difference was that the key/handle was a little firmer to turn as my new spring had a bit more tension than the old one.
An excellent result - and the cheapest repair job I've ever done. We live in an average sized three-bedroom duplex and although we were the first owners we didn't design or build the house. The plan matched what we were planning to build quite closely so it was an easy decision to buy it after the first inspection and walk through. The local builder has done several properties in the local area and has a good reputation, but occasionally there are some things that are found to be not quite right. The single garage also has a small laundry space with a tub and space for a washing machine. We opted for a washer/dryer which was the right choice for the space available. The photo below shows the layout of the laundry nook in the garage, the washing tub with storage underneath and the washer/dryer.  It all looks very normal, now, but I did have to make a modification to make it look like this. Originally the door under the tub opened the other way with the hinge on the right so it opened from the left. That does not sound like a problem but it was very user un-friendly as the door was in the way when you bent down to access whatever you needed from the cupboard.
I noticed that the pre-manufactured tub/cupboard was designed to have the door fitted both ways, opening from the left or from the right. Further investigation revealed that the door and latch could be removed and put on the opposite side such that it opened the other way with no modifications required. It was a cramped and awkward space to work in but it avoided the need to remove the tub/cupboard and avoided disturbing any tiles and sealant behind and beside the tub. The space now works more smoothly as the door can be opened fully to the left against the wall where it is out of the way while accessing the cupboard - simple but important..!! I don't know how long this drain has been like this, but I did notice after the recent lengthy periods of rain that the grass in this area seemed to have no soil under it. I also discovered that if you stood here you could hear the plastic pipes creaking as they are very close to the surface. This is one of our storm water drains on the footpath running to the street kerb. Thankfully it is right beside our green underground power connection box so nobody actually walks on this part of the footpath. It is also quite close to our fence. That said I suspect the builders did this when finishing up and just laid the grass over the top as nobody else would have reason to stand in this exact stop. There were about three or four broken pieces of plastic pipe found inside the drain, one was just hanging there ready to drop off.  What they have done is add a short length of pipe to the piece coming under the fence, and then join it to a fitting to drop the level slightly towards the kerb. A similar configuration on the adjacent pipe is intact. So how to easily fix..?? The pipes are glued together at least partly so attempting to replace it with one new piece of pipe seemed like it may not be possible, and would have required a larger excavation. Considering that nobody will actually walks over this I decided to use three pieces of 100mm PVC pipe joiner, like the broken piece in the centre. Instead of using the complete piece of pipe I cut about 1/4 of the pipe away so it could just slip over the top and hold itself in place. The image below will show you what I mean. I washed the exposed pipe so the glue had a better chance of adhering and let the sun dry it out before fitting the sleeves.  Of course it is also glued into place with the appropriate PVC adhesive and I was a bit more generous than the builders seemed to be with it. The photo above shows two pieces already fitted and the third sleeve ready for a test fitting. The old sleeve joint was left as it also provided some protection and it helped hold the new piece of pipe in place while the glue dried. The finished job was let dry overnight then back filled with soil, grass replaced and watered in.  Although we were the first owners of our home, we didn't build our home so we didn't get to see or supervise any of the construction, this included the side fence. I looked at it recently to see how they had built it as with a new house being built next door there may have been a need for modification. No modification was necessary but I did see that the metal fence posts in the middle, which go down into the concrete retaining wall, did not have caps on the top like they should. I also noticed this specific post was almost filled to the top with rain water - surely not a good thing as it will only encourage rust over time. I purchased three new caps but had to make modifications before they could be fitted, and I had to get most of the water out. As the photo below shows I used some plastic tube to siphon out as much water as possible and this worked quite well. All three posts had at least some rain water caught in them, stagnant and stinky it was too.  After siphoning out the water I used a thin dowel with paper towel on the end to try and soak up any remaining moisture. Again this seemed fairly successful as the paper towel was less damp each time I put it down the bottom of each post. Next I had to make a small gap so the cap could fit over the post as the builder had screwed the fence together without considering this. The side screw was loosened to create a gap, and the top rail was gouged out a bit so the cap could sit down in position. The other thing needed was to cut pieces out of the top timber so it could be screwed back down into place. A couple of saw cuts and some chiseling had a neat fit on all three posts. All I need to do now is apply some more paint to make it look brand new again. Oh - and now to check the back fence to make sure it has the caps on the top of the posts too..!!  A friend of mine asked if I could assist in hanging two pots on her balcony which sounded like a simple task but it turned out to be more complicated than I expected. The photo below shows the end result but there is more to the story. The balcony is in a new complex of units so there is a lot of concrete. The wall behind is indeed concrete with a rendered finish but the feature the pots are hanging from is not. The concrete wall could have easily gone straight up to the ceiling but this feature was added to cover something. The first question was why was it built this way? It was suspected as being a wooden frame with plasterboard but what was behind it, was it safe to drill into, and would it support the weight?  Tapping on the feature revealed it was hollow rather than solid so a hollow wall anchor could possibly be used. Looking at the end of the balcony I saw a small PVC drain pipe disappearing behind the feature. I suspect it is a drain pipe for an air-conditioner on an upper level of the building. Confident there were no electrical cables behind I started to drill a small pilot hole in the position the first pot was to go. Tapping on the feature I could hear the solid edge and the hollow middle into which I thought I was drilling. The external cladding was thicker than expected but instead of then finding hollow space, solid timber was encountered. I discovered the timber frame was made from larger wood than expected, and is perhaps standard building structural pine, although this is clearly not a structural feature. I was confident I would not hit the PVC pipe and kept drilling as deep as the drill would go and encountered only wood. This was a good thing as the solid timber frame would easily hold the weight of the hanging pots, but the hooks I had were for hollow walls. At this point I considered going back to the store to get hooks to screw into wood but arrived at a different solution.
The end result was very pleasing and I must say very solid, even though I technically used the wrong type of fixing. I can tell that if a very heavy weight was applied to either hook, the hook would bend rather than pull out of the wood, or distort the wooden frame and feature on the balcony.
Not a very interesting job, but just one of those things you find you have to do when you buy a new house. There's always something which needs a bit of attention to make it just right. This little problem stems from a neighbouring tree, which seems to drop leaves throughout the year, and also the occasional dead branch. It's close to the back of our house so we have a continual supply of leaves out the back, and also in the gutter. It doesn't take long to fill the gutter and impede the water flow. I purchased some gutter guard from Bunnings and made some extra supports from strips of aluminium. With the support strips cut to length and fitted in place, the gutter guard was added. The gutter guard sits nice and flat so there is plenty of space below for the water to run to the down pipe, and when the leaves are dry the wind will blow them away.  Above: Gutter guard in place with extra aluminium support strips.
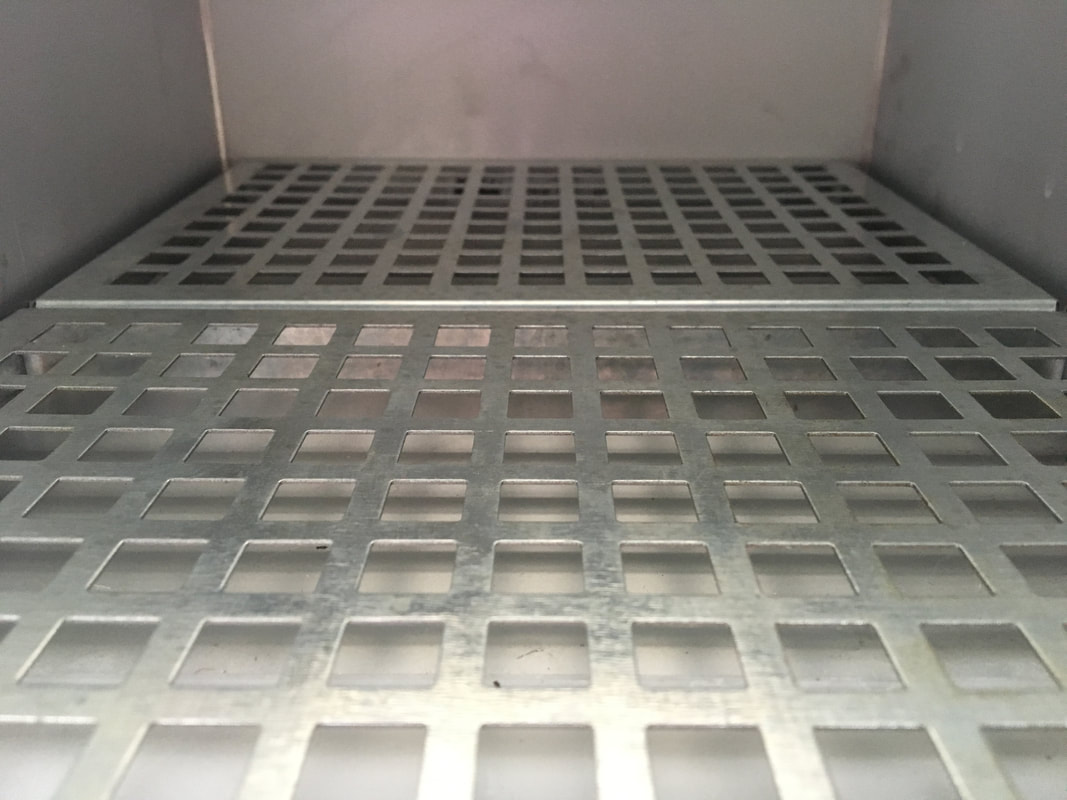
A few months ago we moved into a new home, and when I say 'new' I mean brand new. It wasn't built for us specifically, but we attended the first Open House inspection and made an offer on it the same day. The following day we signed the contract and a couple of months later we moved in. The style, design, fittings and finish are very much to our liking and in fact it is quite similar to what we had planned to build if we had gone down that path. One little problem encountered was with the letter box and mail getting wet when it rained. Despite being a brand new letter box, recessed into the block wall, water still managed to get in there and sit at the bottom, along with any letters, causing them to get soaked. I have not been able to ascertain where the water is getting in but I was determined not to have wet mail. Bunnings came to the rescue as while I was walking around there I discovered the galvanised metal grates as shown below. I don't recall what they were supposed to be used for but when I saw them I realised they would be perfect to provide a 'false floor' in the mail box allowing any letters to sit safely above any water which seeps through to the bottom. All I needed to do was bend the side tabs in a little to make them fit, and fit they did - perfectly. No more water soaked letters when it rains - a simple solution.
 Mail delivered and sitting on the metal grates, above any water that may seep in and collect at the bottom.
|
AuthorAfter spending 22 years in the Telecommunications Industry, I've decided to keep those skills alive and offer my services to people needing assistance with small phone cabling jobs in the home or office. Archives
January 2024
Categories
All
|


 RSS Feed
